Do you need to create striking graphics for company newsletters, blog posts, posters, training materials, and so on?
A nice way to do this is with one of the burst or star shapes. Here you see an example.

This is easy to create:
- Right-click off any object and choose Layout, Blank.
- On the Home tab, in the Drawing group, click the Shapes drop-down arrow and go to the Stars and Banners section. Choose any shape you like and drag it to the desired size on the slide.
 On the Format tab, use the Shape Outline button to format the outline. The burst you see here doesn’t have an outline; I chose No Outline.
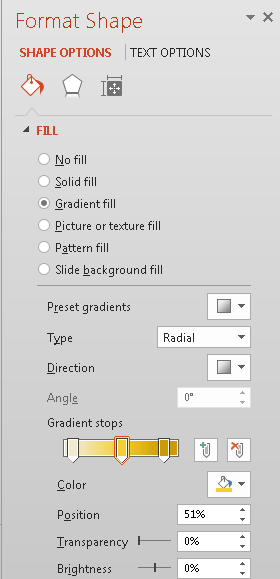
- Again on the Format tab, use the Shape Fill button to format the fill. I used a radial gradient. You can see the settings here.The white color at the center looks like a highlight.
- If you want, you can add a shadow to make the shape appear to hover off the page. On the Format tab, choose Shape Effect, Shadow and choose one of the preset options or choose Shadow Options to customize your shadow. Note: I explain how to use the shadow settings in PowerPoint 2007 and later in this video tutorial: Add drama with PowerPoint’s shadows.
- From the same Shapes drop-down list, choose Text Box and drag a text box on the burst or star. Type the text you want. PowerPoint always defaults to 18 point text in a text box, so you’ll probably want to change it.
- Click the text box’s border and press Ctrl + D to duplicate it as many times as you need to for your text.
- You know how I tell you to be consistent and not use too many fonts? In this case, you can go crazy! Different sizes, fonts, and colors all add to the mayhem and make the shape more striking, so select the text in each text box and format it in any way you want.
- Adjust the spacing and size of the text boxes to make a pleasing array. If you want, you can also rotate some of them, as I did. You’ll probably also need to resize the burst or star and you can rotate that as well.
- Select everything. (If you used the Blank layout, you can press Ctrl + A to select everything.
- Right-click anywhere inside the objects and choose Save as Picture and save it. Now, you’ll be able to insert it anywhere you need it.
Do you have any techniques for creating graphics like this? Leave a comment!
Great idea and great instructions – as usual.
You’re a genius!!!!!!!!!!!!!!!!
Are the instructions for PPT 2010 or 2013?
Thanks.
Madeline
Wow, that’s quite a comment! The instructions should work for 2007, 2010 and 2013.
Just downloaded your article to my Google Drive.
Take care and keep presenting.
Madeline.
Je vous remercie pour ces instructions. Alors je vais essayer tout de suite !
Cet article est enrichissant. Je vous en remercie
This articles is interesting! Need your opinion on my thoughts. I intended to use gradient in icon but afraid viewer can’t see the data.
Kareem, with a gradient, you have to be sure that any text on top of it is legible. If you keep all the gradient colors either light (for dark text) or dark (for light text) should should be OK. Don’t use a gradient just to be fancy; always focus on the message.