Your work in PowerPoint can go faster and easier if you customize the interface so that you don’t have to click so many times to find commands that you use often. In PowerPoint 2010 and 2013, you can customize not only the Quick Access Toolbar (usually at the top left of your screen) but the entire ribbon.
Many power users have a Quick Access Toolbar (QAT) that stretches across the entire PowerPoint window. If you want to do that, you should display it below the ribbon, instead of above the ribbon — where it will run into the Title bar that shows the name of your presentation and the words “Microsoft PowerPoint.”
To move the QAT, click the down arrow at the right end of the QAT and choose Show Below the Ribbon.
I cover how to customize the QAT in an earlier blog post, “Work faster in PowerPoint.”
Customize the ribbon
You can go further and customize the ribbon. Here’s how:
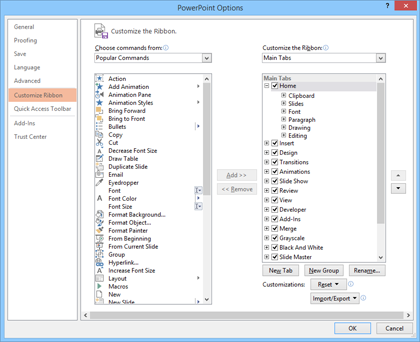
In any blank space on the ribbon, right-click and choose Customize the Ribbon. The PowerPoint Options dialog box opens with the Customize Ribbon category highlighted. (You can also get to the same place by choosing File, Options and clicking Customize Ribbon.
One of the simplest things you can do is to display a tab that isn’t displayed by default, such as the Developer tab. That tab has a number of uses and you can read about a cool one in my older (but updated) blog post, “Add notes in PowerPoint in Slide Show view.”
Notice the New Tab and New Group buttons. Yes, you can create your own tabs and add groups to an existing tab. (A Group is a section on a tab.)
Also notice the drop-down list at the upper right, below the Customize the Ribbon heading. Here you can display Main tabs (tabs that appear all the time), Tool tabs (tabs that appear when an object is selected) and all tabs.
The commands are on the left. From the drop-down list at the tip, you can choose Popular Commands, All Commands, and the wonderful Commands Not in the Ribbon. (You’ll find some gems there.)
Here’s the process
- Select an item on the right. You often need to click the plus sign to its left to expand it and see what’s inside.
- Find a command on the left and select it. Sometimes, there are multiple items with the same name, so hover over it to read a tooltip that explains more.
- Click Add.
You can also reorder items on the right-hand side by selecting them and clicking the Up or Down Arrow.
Here’s a 2-1/2 minute video showing how I add a customization to the ribbon.
You’re so awesome! I do not think I have read anything like that before.
So good to discover another person with unique thoughts on this subject
matter. Really.. many thanks for starting this up. This website is one thing that’s needed on the internet, someone with some
originality!